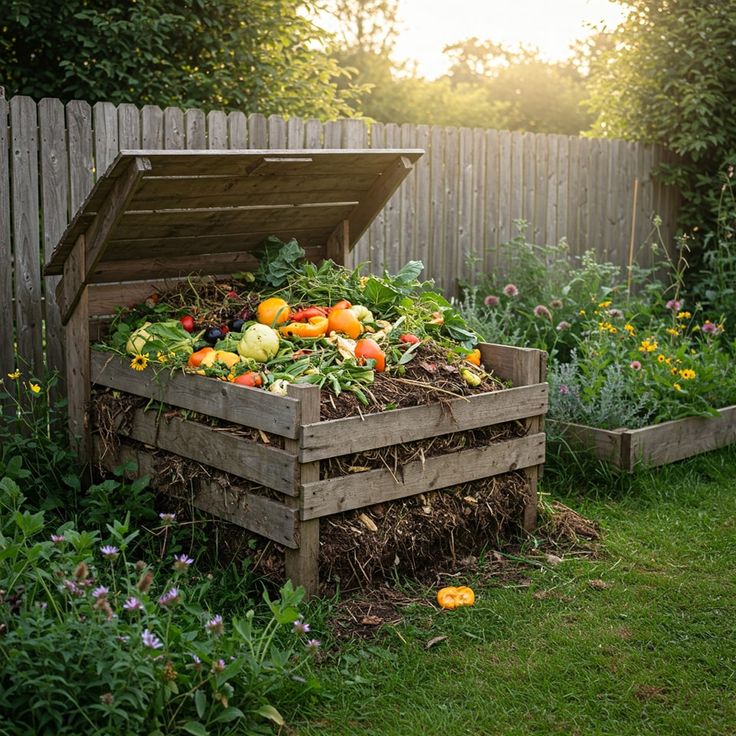
What Is Vermicomposting?
Vermicompost is made when earthworms eat materials and break them down. This happens when tiny living things and bigger living things work together at the temperature of a room. Vermicomposting, which is also called worm composting, creates a rich organic material that is perfect for the soil. This material has many nutrients that plants need to grow. It also has helpful tiny living things.
You can mix vermicompost with the soil you use in pots at a ratio of ten percent vermicompost to ninety percent potting soil. You can just put the vermicompost right into the ground. Either way you do it the vermicompost gives plants organic material and nutrients and helpful tiny living things. Vermicomposting is when earthworms take waste and break it down into a nutrient-rich material that is like manure. The main earthworms that are used for vermicompost are wigglers and redworms, which are the kinds of worms that are most often used for vermicomposting.
Vermicomposting, or worm composting, is a way to take waste and break it down into a material that is, like humus. This process uses a system that includes living things and earthworms to turn the waste into something useful. Vermicompost is a thing to use in the garden because it is made from vermicomposting, which is the process of using earthworms to break down organic waste.
Benefits of Vericomposting:
Improves soil:
Vermicompost helps soil particles stick together, which forms spaces that allow the soil to hold and share water and oxygen. This means that vermicompost can really improve the way soil holds water.
Vermicompost is full of carbon-organic matter, like humus, which is critical for topsoil that has been damaged by farming methods that are not good for the earth. When we add carbon back into the soil, it helps plants grow strong, which means they can do their job of making food from sunlight. During this process, plants take in carbon dioxide, give off oxygen, and pass carbon back into the soil, where it can be used again as food for plants, like vermicompost.
Soil that has a lot of matter from compost or vermicompost is like a magnet for earthworms. These worms help make the soil more aerated and richer because of their castings. It is good to know that the worms that come to the soil are not the same worms we use for vermicomposting. Also, worms on their own cannot fix soil.
The benefits of vermicompost for plants are many:
– Seeds sprout faster with vermicompost.
– Seedlings and plants grow quickly with vermicompost.
– Plants bear fruit earlier, and the fruit is bigger with vermicompost.
– Vermicompost helps control plant diseases.
– It also helps reduce pest problems.
– It encourages pollination.
Works faster:
Vermicomposting works faster than regular composting, giving us usable compost in weeks instead of months.
Enhances Soil Microbial Activity:
Vermicomposting also boosts the activity of soil microbes, such as bacteria and fungi. These microbes break down materials into nutrients that plants like those grown with vermicompost can use. Over time they improve the soil’s structure and fertility.
Produces Natural, Chemical-Free Fertilizer
The result of composting or vermicomposting is a fertilizer that is rich in nutrients.
– It does not include chemicals or synthetic ingredients.
– It is safe for plants, soil, and people.
– It releases nutrients slowly and steadily over time, which is what vermicompost is all about.
Materials You Need:
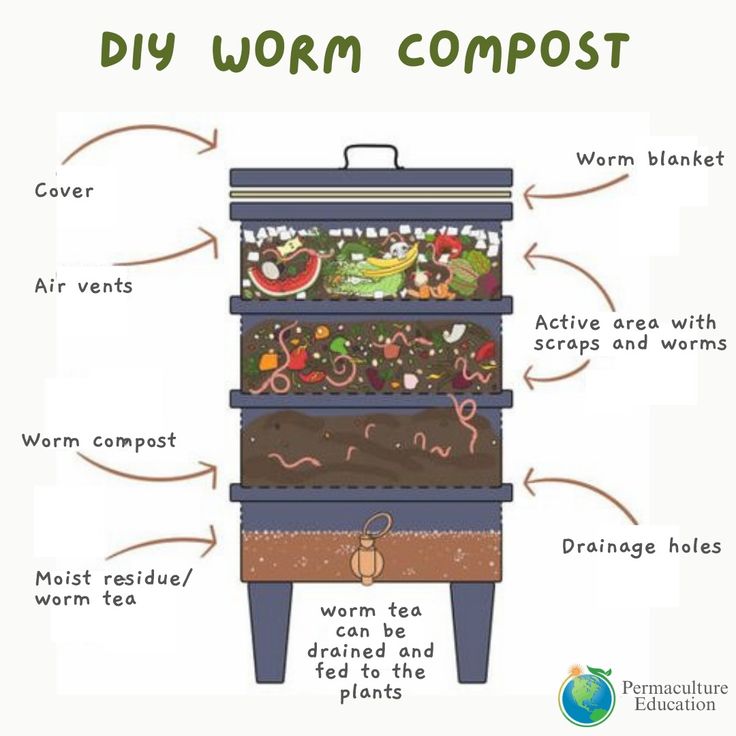
Composting Bins:
Your worms need a place to live, so the first thing you will need to start composting with worms is a worm bin.
Not all bins are the same; some materials like plastic and wood work for housing worms.
It is important to remember that the worm bin should not have any properties that can hurt bacteria and other helpful tiny living things because these tiny living things are needed for the composting process.
You can buy a made worm bin or make your own.
(Plastic Bins):
This type of worm bin does not need a bin, just any plastic container that can hold more than three gallons.
Things like buckets, tubs, trash cans, and similar items are often used by people who want to start composting with worms without spending a lot of money.
All you need to do is poke some holes in the plastic to let air in and give the worms oxygen.
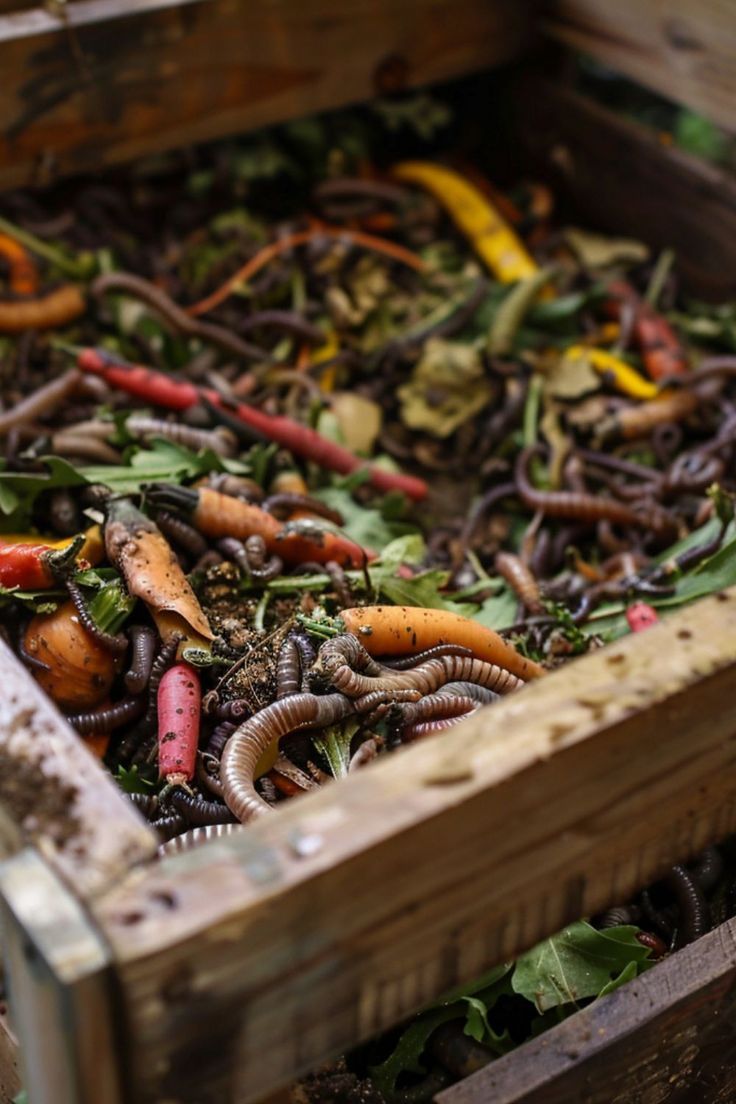
Earthworms:
Composting with worms is usually done with earthworms that live in soil. These earthworms like soil because it does not require much digging and lets them eat food scraps more easily. They do well in a worm bin or worm bed.
The Red Wiggler Worm:
The red wiggler is probably the most popular type of worm for composting with worms.
The red wiggler worms can eat half their body weight in a day. Not only do the red wiggler worms make high-quality compost, but they also reproduce quickly.
The red wiggler worms like to mate in humid conditions and can grow up to five inches long.
Prepare Bedding Material
Worms need a comfortable place to live. Make a layer of brown organic material and keep it damp, but not wet, like a wrung-out sponge.
Maintain Moisture Levels:
Check the moisture in your worm bin
If it is too dry, spray some water on it.
If it is too wet, add some bedding material.
Avoid Direct Sunlight:
Place your worm bin in a sheltered spot.
The worms are sensitive to sunlight and extreme temperatures.
Step-by-Step Process:
Step 1: Selecting an appropriate container:
The initial significant process in your vermicomposting life is the selection of the appropriate vessel.
The success of your vermicomposting system can be highly affected by the type of container you use. The following are some of the popular alternatives:
Hungry Bin and Indoor Worm Bucket: Hungry Bin is an excellent option in that it assists in transforming the kitchen waste into quality fertilizer for the garden.
Another great choice is the Indoor Worm Bucket, which is capable of processing food waste using only a square foot of space. It is simple to operate and may even be installed in your kitchen so that you can access it easily.
Plastic Storage Bin: This is widely available and cheap. Find a container with a lid to assist in keeping things damp and keeping out pests. One should have a bin of about 18-24 long, 12-18 wide, and 12-18 high that is appropriate to the person just beginning.
Wooden Worm Bin: In case you want to be more natural and attractive, a wooden worm bin is possible.
Wooden bins provide superior insulation to your worms and may be pretty in your garden.
Step 2: Bedding Materials Preparation
Your worms require a conducive and enabling environment to survive and perform their work.
Vermicomposting bedding serves as a source of habitat and carbon to the worms.
The following are the supplies that you will require:
Shredded Newspaper or Cardboard: Cut newspaper or cardboard into small strips or pieces.
You should not use glossy paper or colored ink because they may have some harmful component to your worms.
Coconut Coir: This is a fine substitute or addition to newspaper.
Coconut coir is a friendly substance that has the ability to retain moisture and is composed of coconut husks.
A Bit of Soil: Adding a little garden soil or completed compost will add beneficial microorganisms to the bin.
Water: Have the bedding wet, like a sponge.
It is not supposed to be too wet because worms need air to breathe.
It is also important to add materials such as dry leaves, shredded paper, or coco peat in processes such as composting or vermicomposting.
They are called “bedding” or “brown materials,” and they assist in creating a good environment to achieve decomposition and plant growth.
Step 3: Selecting the appropriate earthworm species:
Not every earthworm can be used to make vermicompost.
You should choose the correct species to use. The main species used in vermicomposting are the following:
Red Wigglers (Eisenia fetida): These worms are the most suitable ones in vermicomposting.
They are prolific, reproduce fast, and are good at inhabiting a small area such as a worm bin and are thus ideal for new entrants.
Step 4: Introducing Your Earthworms:
Fill the container with bedding material up to halfway.
Put your earthworms on top of the bedding. They will dig into their home.
Step 5: Feeding Your Worms
When your worms are comfortable, give them food.
Worms eat a lot and love kitchen leftovers.
Here are some things you can feed your worms:
Worm Chow: This helps them grow bigger and healthier.
Worm chow is a mix of grains, grasses, and helpful ingredients that keep them happy and healthy.
Worms love Worm Chow.
Oyster Chow: Oyster flour helps balance the pH, supports their health, and aids digestion.
This makes the worm castings better for plants.
Worms benefit from Oyster Chow.
Fruit and Vegetable Scraps: Worms enjoy apple cores, banana peels, coffee grounds, and leftover veggies.
They love fruit and vegetable scraps.
Eggshells: Crushed eggshells help with digestion.
Eggshells are good for your worms.
Don’t feed them citrus fruits, onions, garlic, or spicy foods.
These can be too acidic or strong for the worms.
Step 6: Maintenance:
Vermicomposting doesn’t take work, but a little care helps.
Here are some things to keep in mind:
Moisture Check: Check the moisture level
It should feel like a damp sponge.
If it’s too dry, add water.
If it’s too wet, add bedding.
Harvesting Compost: When the bedding turns into crumbly compost (usually every 2, to 3 months) collect it.
Move the compost to one side of the bin.
Add bedding and food on the other side.
Let the worms move to the food.
Then take out the compost to use in your garden.
The worms will help you make compost.

Leave a Reply